Your Muskoka sauna was built to endure. Crafted from premium Canadian Western Red Cedar — one of the most naturally resilient woods on the planet — it is designed not merely for years of use, but for decades. With proper stewardship, your sauna will outlast the flooring, the fixtures, and nearly everything else in your home. The question is never whether your sauna can last a lifetime. The question is whether you will give it the care it deserves.
This guide is your complete reference for protecting that investment. From the five-minute ritual after every session to the annual deep clean that sets your sauna up for another season, every step here is an act of respect for the craftsmanship built into your cedar walls. Whether you own one of our Superior Hydra Saunas, a Neptune, or a Hudson, the principles of proper care are the same. Preserve the wood. Protect the heat. Honour the ritual.
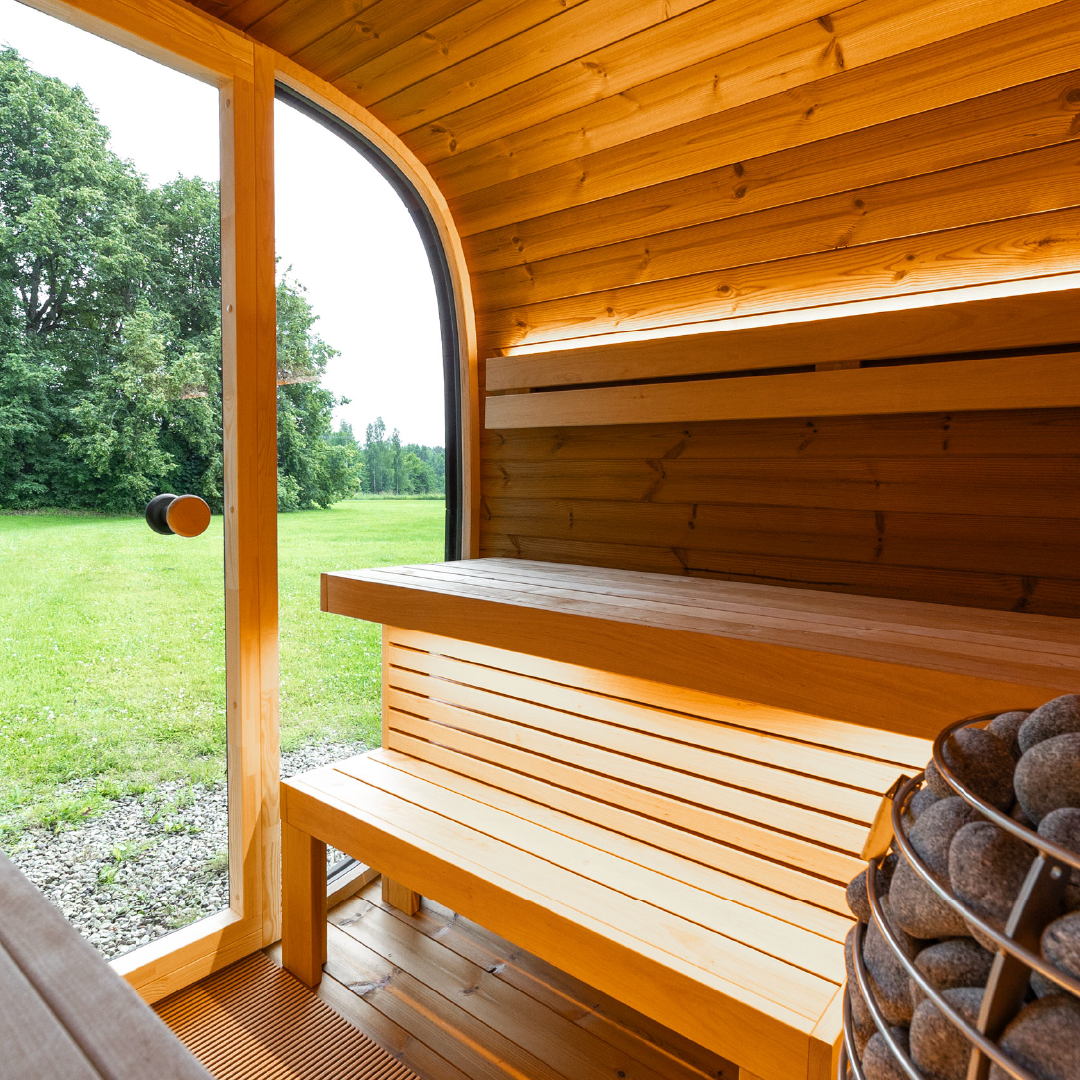
Understanding Cedar — Why It’s Both Durable and Delicate
Western Red Cedar is an extraordinary material. Its natural oils — thujaplicins and thujic acid — give it inherent resistance to moisture, decay, and insects. This is why artisan cedar has been the material of choice for saunas, outdoor structures, and fine woodworking for centuries. It does not warp easily, it breathes well under heat, and it develops a beautiful silver-grey natural patina over time if left untreated outdoors.
But cedar is also a porous, living wood. It absorbs what it is exposed to. Harsh chemicals sink into its fibres and break down those protective natural oils. Standing moisture, if left long enough, can encourage mould in the grain. Abrasive tools scratch open the surface, allowing deeper penetration of water and contaminants. Soap residue left in the wood can cause discolouration and odour over time.
Understanding this duality — robust yet sensitive — is the foundation of proper sauna care. You are not maintaining a piece of painted furniture. You are stewarding a natural material that responds to how it is treated. Gentle, consistent care rewards you with decades of longevity and a richer, more beautiful patina. Neglect or harsh treatment accelerates deterioration and voids the character that makes a premium cedar sauna irreplaceable.
The good news: caring for cedar is simple. It requires no special expertise and very little time. It requires only consistency and the right approach.
After Every Session — The Simple Habits That Matter Most
The most important cleaning happens in the fifteen minutes after you step out. Heat opens the wood's pores; what you do in this window determines how your sauna ages over thousands of sessions.
Ventilate immediately. Before you close the door, prop it open or engage the vent. The goal is to allow the interior to cool and dry completely before the sauna is sealed. Trapped moisture is the primary enemy of cedar longevity. Even a well-built sauna can develop surface mould if it is closed up wet after every use. Leave the door open or ajar for at least 30 minutes — longer is better.
Wipe down the benches. Using a clean, dry or barely damp cloth, wipe the bench surfaces while they are still warm. This removes sweat, body oils, and any surface moisture before it has time to penetrate the grain. You do not need soap. You do not need cleaners. A dry cloth or one lightly dampened with clean water is all that is required for routine post-session wiping.
Remove damp towels and accessories immediately. Towels, sauna hats, buckets, and ladles left resting on cedar benches trap moisture against the wood and create the perfect conditions for mould, mildew, and staining. Remove them every time, without exception. Hang towels to dry outside the sauna. Rinse ladles and buckets and store them inverted or in a ventilated space.
Inspect the floor. A quick glance is enough. If water has been splashed during steam rituals, give the floor a wipe. Cedar floors are resilient, but pooling water over time can cause grain raising and eventual softening.
That is it. Five to fifteen minutes of attention after each session, done consistently, prevents the majority of maintenance issues before they begin.
Weekly Cleaning Routine
If you use your sauna several times a week, a brief weekly cleaning keeps the interior fresh and extends the time between deeper maintenance sessions. If you use your sauna less frequently, this routine can be done every two to three sessions instead.
Scrub the benches. Using a soft-bristle brush — a natural fibre brush or a dedicated sauna bench brush — scrub the bench surfaces along the grain with warm water. Do not use soap. For any discolouration or sweat staining, a paste of baking soda and water applied with the brush works well and is completely safe for cedar. Rinse with clean water and allow to dry fully with the door open.
Clean the floor. Sweep or vacuum any debris. If the floor feels grimy, mop lightly with warm water. Again, no chemical cleaners. Cedar floors can handle moisture, but they need to dry fully — ensure good ventilation after any wet cleaning.
Wipe down the walls and headrests. A damp cloth along wall panels near the benches removes any splashed water or oils that have accumulated. Pay special attention to the area just above the bench line where steam and splashed water concentrate.
Clean the heater exterior. Wipe the exterior of your sauna heater with a dry cloth to remove any dust accumulation. Do this only when the heater is completely cool. Never use water or cleaning agents on the heater unit itself.
Check the door seal and hinges. A quick visual inspection of the door gasket and hardware each week catches small issues — a loose screw, a slightly misaligned seal — before they become problems. A well-sealing door is essential to heat efficiency and interior preservation.
Monthly Maintenance
Once a month, set aside a slightly longer window for maintenance tasks that keep your sauna's mechanical and structural components in peak condition.
Inspect the sauna stones. Your sauna stones — whether you are running a traditional Finnish löyly ritual or simply enjoying dry heat — should be inspected monthly. Remove the stones from the heater basket and examine them. Stones that are cracked, crumbling, or excessively flaky should be replaced. Degraded stones can block airflow through the heater basket and, in worst cases, shed debris onto the heating elements. Arrange good stones back with larger pieces on the bottom and smaller on top for optimal airflow and steam distribution.
Tighten bench screws and hardware. The repeated expansion and contraction of cedar under heat cycles will gradually loosen hardware over time — this is normal and expected. Use a screwdriver or drill to check and tighten bench screws, bracket hardware, and backrest connections monthly. This takes five minutes and prevents the progressive loosening that can eventually compromise bench structural integrity.
Inspect the heater element area. With the heater completely cool, inspect the heating element area for any visible debris, dust accumulation, or signs of corrosion on the wiring connections. If you notice any electrical irregularities — unusual smells during operation, inconsistent heating, visible damage — contact our team before your next session. Never attempt to repair electrical components yourself.
Check ventilation openings. Ensure that all ventilation slots and openings are clear of obstruction. Proper airflow is essential both for a comfortable sauna experience and for the long-term health of the wood interior. Blocked ventilation traps moisture and creates uneven heat distribution.
Seasonal Deep Clean
Twice a year — ideally in spring and fall — your sauna benefits from a more thorough deep cleaning and maintenance session. This is the moment to address any accumulated wear, refresh the wood surfaces, and prepare for the season ahead.
Sand and re-oil the benches. Over time, bench surfaces accumulate oils from skin contact, may develop minor surface greyening, and can feel roughened from repeated moisture exposure. Light sanding with 120-grit sandpaper along the grain restores the surface to smooth, clean cedar. After sanding, wipe away all dust and apply a thin coat of sauna-specific bench oil or pure food-grade linseed oil. This replenishes the wood's natural moisture balance, reduces the rate at which sweat is absorbed, and preserves the rich colour of fresh cedar. Allow to dry completely before the next use — typically 24 hours.
Deep clean the floor. The seasonal clean is the time to give the floor a more thorough treatment. Scrub with warm water and a stiff brush, working along the grain. If there is any surface mould present (appearing as dark spotting), a solution of one part white vinegar to four parts water applied with a brush, left for 15 minutes, then rinsed and dried, is an effective and cedar-safe treatment.
Wood treatment for walls and ceiling. Wall panels and ceiling wood rarely need the same attention as benches, but a light inspection and wipe-down during the seasonal clean catches any areas that may be developing surface issues. If any panels show significant greying or surface roughness, very light sanding followed by a diluted sauna oil treatment can restore their appearance.
Inspect the exterior thoroughly. Canada's climate demands seasonal attention for outdoor saunas. Inspect all exterior joints, caulking, and sealant lines for cracking or separation — freeze-thaw cycles from our harsh Canadian winters are the primary driver of exterior joint failure. Re-caulk any openings before moisture can penetrate. Check roofing material for integrity, especially after winter snow loads. Inspect the base and any decking for signs of rot or structural movement. Addressing small issues seasonally prevents large repairs later.
Explore our full range of outdoor saunas and cedar barrel saunas designed to endure Canadian seasons with confidence.
What NOT to Use on Your Sauna
Knowing what to avoid is as important as knowing what to do. Some of the most common cleaning products used elsewhere in the home are actively damaging to cedar and sauna components.
Bleach and chlorine-based cleaners. Bleach is one of the most destructive substances you can introduce to a cedar sauna. It strips the wood's natural oils, degrades the fibres, causes discolouration, and leaves a chemical residue that vaporises into the air during heating — creating an unhealthy environment. Never use bleach in any form inside your sauna.
Harsh chemical detergents and soaps. Dish soap, bathroom cleaners, multi-surface sprays, and similar household products leave residues that soak into cedar's porous surface. When the sauna heats, these residues off-gas into the air you breathe. They also interfere with the wood's natural oils and can cause long-term surface damage. The only cleaning agents appropriate for cedar are water, baking soda, white vinegar (diluted), and sauna-specific products.
Power washers and high-pressure water. The pressure from a power washer drives water deep into wood fibres, raises the grain aggressively, and can force moisture into joints and connections that were designed to remain dry. Exterior cleaning should be done with a gentle garden hose and a brush — never a pressure washer.
Abrasive scrubbers and steel wool. These scratch open the cedar surface, creating pathways for moisture and contaminants to penetrate deeply. Use only soft-bristle brushes and fine-grit sandpaper when abrasion is required.
Essential oils and aromatherapy oils directly on wood. Many aromatic oils, while pleasant, can stain cedar and create sticky residue. If you enjoy aromatic sauna rituals, use a purpose-built sauna aroma cup or a stainless steel bowl placed near the heater — never drop essential oils directly onto the wood benches or walls.
Caring for Your Outdoor Sauna Through the Seasons
Canada's climate presents a genuinely demanding set of challenges for outdoor structures. Our harsh winters, spring thaw, summer UV exposure, and humid summers create a full cycle of stresses that an outdoor sauna must withstand. With proper preparation, your outdoor sauna or cedar barrel sauna will meet every season with strength.
Spring: After winter, inspect all exterior surfaces and hardware thoroughly. Look for any cracking or checking in the wood caused by freeze-thaw cycles, any loosened caulk or sealant, and any roofing damage from snow loads. Clean the exterior with a gentle brush and water. If the exterior cedar has weathered significantly, this is the ideal time for a fresh application of an exterior wood stain or UV-protective oil finish.
Summer: UV radiation is one of the primary causes of cedar degradation over time — it breaks down the lignin that holds wood fibres together and causes surface greying and checking. A UV-protective exterior stain or oil, applied annually, is the most effective defence. In high-humidity summer conditions, ensure your sauna is fully ventilated between uses to prevent interior condensation buildup.
Fall: Pre-winter preparation is critical for longevity. Inspect and re-caulk all exterior joints and gaps. Apply a fresh coat of exterior wood treatment if needed. Clear any debris from the roof. Confirm that drainage around the sauna base is clear so that snowmelt and rain will flow away from the structure rather than pooling beneath it.
Winter: If you plan to use your sauna through winter — and many of our clients do, with great pleasure — clear snow accumulation from the roof regularly to avoid excessive structural load. The sauna itself handles cold temperatures well, but avoid running water features or bucket steam rituals in temperatures well below freezing if water supply lines are involved. If you are winterising the sauna for seasonal closure, ensure the interior is completely dry before closing up, and leave a small vent crack to allow any residual moisture to escape.
Proper weatherproofing is not a one-time task. It is an annual investment that pays dividends in structural integrity, preserved appearance, and genuine longevity.
When to Call the Experts
The vast majority of sauna maintenance is well within the capability of any homeowner. But there are moments when professional attention is the right call — and recognising them is part of being a responsible sauna owner.
Electrical concerns. Any unusual smells during operation, inconsistent heating, tripped breakers, or visible damage to wiring or the heater unit should be assessed by a qualified electrician or sauna technician before the sauna is used again. Do not attempt electrical repairs yourself.
Structural movement or rot. If you notice significant movement in bench framing, floor boards, or wall panels, or if any wood feels soft or punky when pressed, have it assessed professionally. Rot that is caught early is far less costly to address than structural failure discovered after the fact.
Heater service and replacement. Sauna heaters have a service life. If your heater is not performing to specification — taking much longer than usual to reach temperature, cycling irregularly, or producing uneven heat — it may be time for a service inspection or element replacement. Our team can advise on the appropriate service interval for your specific heater model.
Upgrades and enhancements. If you are considering adding features — chromotherapy lighting, upgraded controls, a steam generator, or an infrared element — professional installation ensures that additions are integrated safely and in a way that protects your warranty and the integrity of the original build.
We are here for all of it. Reach out to the Muskoka Sauna Co. team for service, upgrades, or simply to talk through a maintenance question. This is a relationship, not a transaction — and we stand behind every sauna we build.
Browse our complete collection of premium Canadian saunas, including our indoor cedar cube saunas, and discover the model that belongs in your home. Read more about the health benefits of regular sauna use to understand why protecting this investment is so worthwhile.
Frequently Asked Questions
How often should I deep clean my sauna?
A thorough deep clean — including bench sanding, re-oiling, and full exterior inspection — should be performed twice a year, ideally in spring and fall. Routine after-session wiping and weekly cleaning handle day-to-day maintenance, while the seasonal deep clean addresses accumulated wear and prepares the sauna for the demands of the coming season. In heavier-use households, quarterly bench sanding may be warranted.
Can I use a pressure washer on the outside of my outdoor sauna?
No. Pressure washers force water deep into wood fibres and joints, raising the grain, driving moisture into sealed areas, and potentially compromising structural connections. Use a garden hose set to a gentle flow combined with a soft-bristle brush for exterior cleaning. For heavy staining, a diluted solution of white vinegar and water applied with a brush is effective and safe for cedar.
My sauna benches are starting to look grey and feel rough. What should I do?
Surface greying and roughness are normal signs of natural weathering and use — they do not indicate damage. Light sanding with 120-grit sandpaper along the grain removes the grey layer and restores the warm colour of fresh cedar beneath. Follow with a thin application of sauna-specific bench oil or food-grade linseed oil. Allow to cure fully before use. This process can be repeated as often as needed to keep benches looking and feeling their best.
I noticed a small dark spot on my bench. Is it mould?
It may be. Surface mould in saunas typically results from moisture being trapped without adequate ventilation — most often caused by damp towels left on benches or the sauna being closed up immediately after use. For small surface spots, a diluted solution of white vinegar (one part vinegar, four parts water) applied with a brush, left for 15 minutes, then rinsed and dried thoroughly, is effective and cedar-safe. After treatment, improve your ventilation habits to prevent recurrence. If mould has penetrated deeply into the wood or covers a significant area, contact our team for guidance.
How long do sauna stones last, and how do I know when to replace them?
Quality sauna stones — properly selected igneous rocks like olivine diabase or peridotite — typically last three to five years with regular use before they need replacement. Inspect them monthly: stones that have cracked into small pieces, crumble when handled, or are visibly flaking should be replaced. Degraded stones reduce the quality of your steam ritual and can shed debris onto heating elements. When restocking, choose stones designed specifically for sauna use — never use river rocks or field stones, which can contain water pockets that cause dangerous cracking under heat.


